Sunday 16 December 2012

twisted headcase


With 5mm straight needles and aran weight yarn, cast on 4 sts

Knit 4 rows. Make buttonhole on row 5: K2 YO K2tog. K1 row.

Work 18 rows garter stitch, increasing 1st at each end of the next and every following alternate row. (22sts)

Work 4 more rows garter stitch.

Begin cable panel:

Row:
1.  K5 P2 K8 P2 K5
2. K7 P8 K7
3. K5 P2 C8F P2 K5
4. K7 P8 K7
5-8 Repeat rows 1 and 2 twice.

Repeat the cable panel 9 times (or until the band is approx 4.5" short to wrap around head when slightly stretched), finishing on a 4th row.

Work 4 rows garter stitch.

Work 18 more rows of garter stitch, decreasing 1st at each end of next and every following alt row. (4sts)

cast off

Sew button to cast off edge.

Have warm ears!


Sunday 2 December 2012

Girlie Frills


My God-daughter - "E" - has asked for a baking party for her birthday next month. There will be 6 girls and a very small boy in total.

I thought it would be nice to make them each a little pinny and a head band as take home gifts. I found a lovely duvet cover in Wilco's for a tenner, and set to work chopping it up.

The main part of the pinny is made from a rectangle of the reverse side of the cover, and the pocket and waistband from cut out motifs from the front.


First cut a rectangle about 24" x 16" for the pinny. Turn a double hem of about half an inch along the sides and bottom.
 
Then cut a rectangle about 9" x 7" and hem the top for the pocket. Press under half an inch along the sides and bottom.
 
Cut another rectangle for the waistband 16" x 14"
 
Sew the pocket in the middle of the main rectangle, 4" down from the top


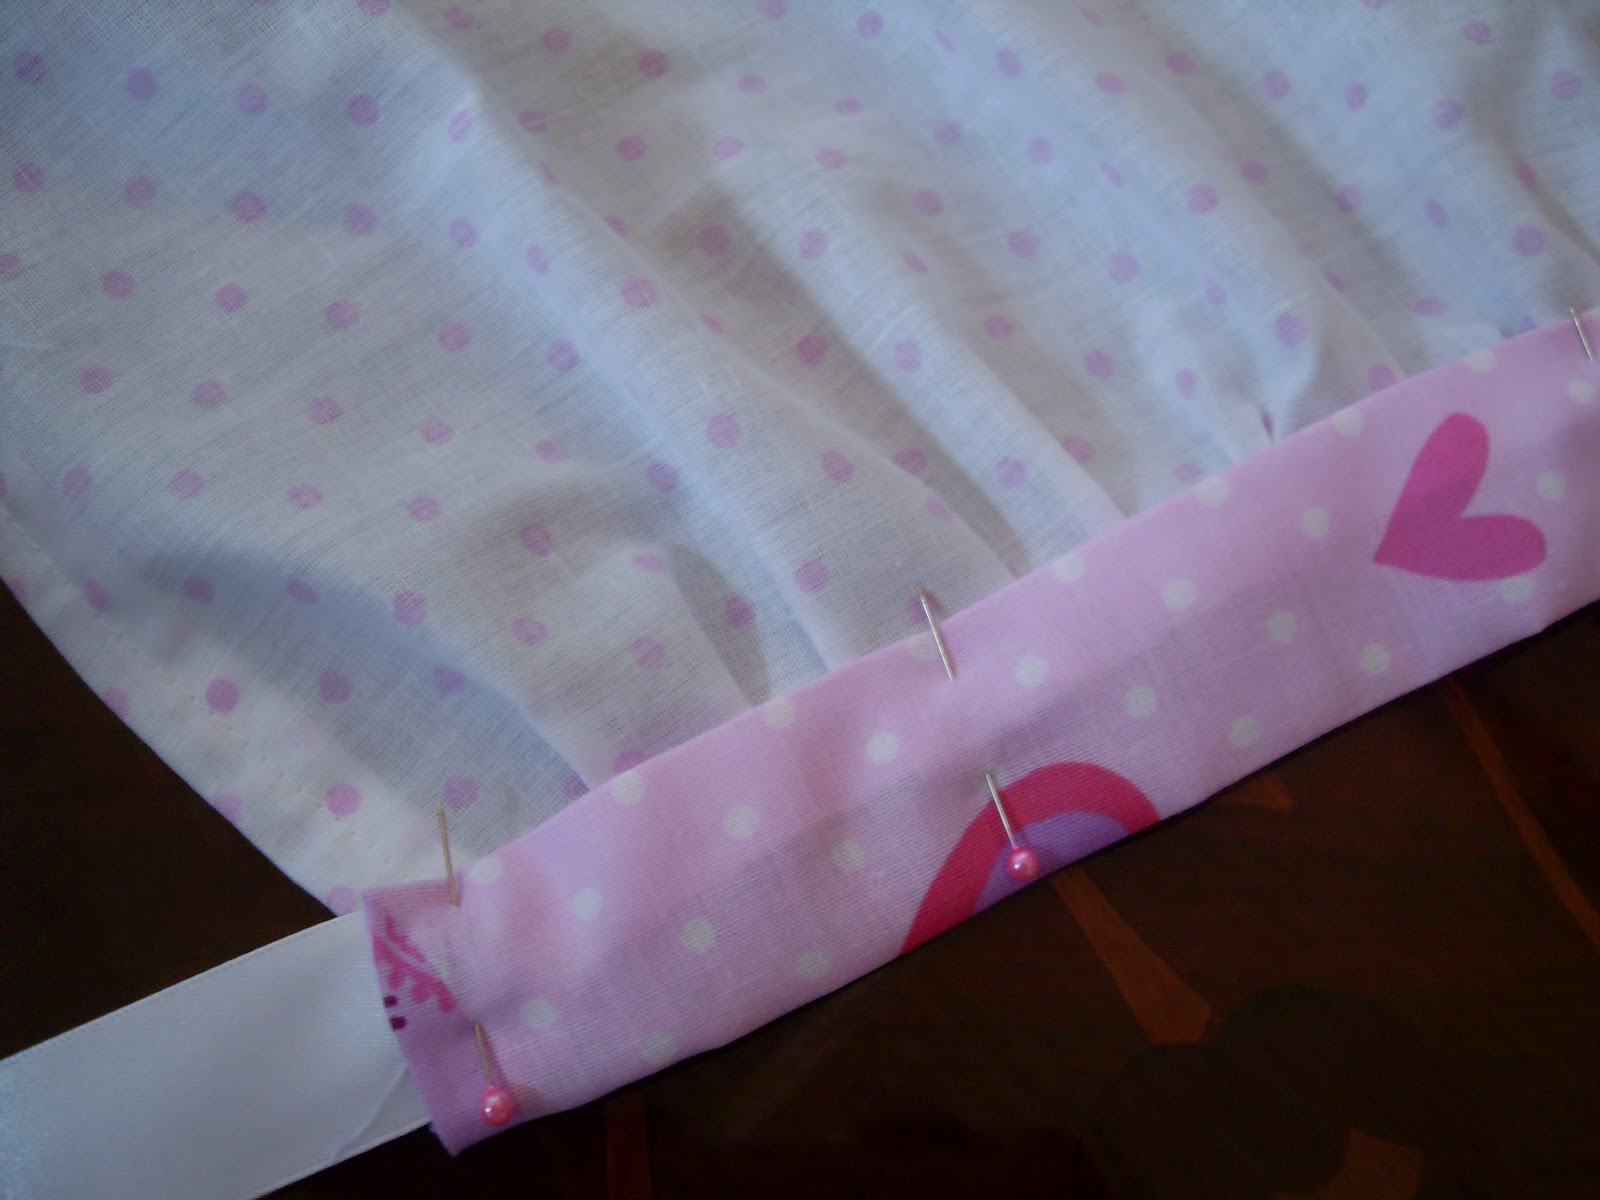
Sew a running stitch along the top of the pinny, and gather to fit along the waistband, allowing half inch hem each end of the waistband. Spread the gathers evenly and pin to the right side of the waistband along one long edge, turning under half an inch each end of the band.


 Sew just below the gathering stitch
 
Press under a half inch hem along the other long edge of the band and then fold the band in half over to the right side of the pinny. Press and pin.


Cut 2 18" lengths of 1" wide ribbon and hem one end of each. Sandwich the raw end of one ribbon into each end of the folded waistband and stitch in place.
 
 
The scarves are even easier:
Cut a triangle approx 20" along the top and 14" each side
 
 
Then turn over a double hem on the wrong side along the 2 shorter sides. Snip off the extra "bit" you get in each corner.


Turn under a double hem on the right side of the top edge. Pin or tack ribbon along this hem, leaving approx 12" at each end to use as ties.
 
 
I put a pinny and a scarf in each tin and added a chocolate coin, as well as a couple of labels - 1 so they can label their tin, and 2 so they can wear a name bade to stop me being confused! (hope they don't swap about!)
 
 
And for the little boy I made a chef outfit (although there is a spare in case he would rather wear pink)
 
 
Quite cute take home gifts I think!
 

Saturday 1 December 2012

A bit of a Twit


I have been looking for a coffee cosy pattern that has a bottom and a handle, that I can make from DK acrylic stash, without success. I tried my hand at designing one, and this is what I came up with (after much ripping back and tangles!)

I used a 4mm circular needle and DK weight yarn. You will also need a cable needle and a coffee cup! This is worked mainly in the round, bottom up.

Abbreviations:
  • Kfbk = Knit front and back of the same stitch
  • C4B = slip next 2 sts onto cable needle and hold at the back of the work. K the next 2 sts from needle, then K the 2 sts from cable needle
  • C2B = slip next st onto cable needle and hold at back of the work. K the next st from needle, then K the st from cable needle
  • C4F = slip next 2 sts onto cable needle and hold at the front of the work. K the next 2 sts from needle, then K the 2 sts from cable needle
  • C2F = slip next st onto cable needle and hold at the front of the work. K the next st from needle, then K the st from cable needle
Cast on 4 stitches
  1. Kfbk 4 times (8sts)
  2. Knit across
  3. (Kfbk K1) 4 times (12)
  4. Knit across
  5. Join to knit in round. (Kfbk K2) 4 times (16)
  6. Purl around (making garter stitch in the round)
  7. (Kfbk K3) 4 times (20)
  8. Purl
  9. (Kfbk K4) 4 times (24)
  10. Purl
  11. (Kfbk K5) 4 times (28)
  12. purl
work 6 round in garter stitch, increasing 2 sts evenly in last round. (30)

Main body of cosy:
  1. (P7 K8) twice
  2. As row 1
  3. (P7 C4B C4F) twice
Rows 4 - 8 as row 1
Row 9 as row 3
Rows 10 - 13 as row 3
Row 11 P7 C2B K4 C2F
Purl 2 rows
Beginning with a K row, work 6 rows in garter stitch

Divide for handle:

K3 K2tog K13 and turn work
K14 and turn. Leave remaining 15 sts on a stitch holder and continue on these 14 sts for 1st handle.

K2 tog K to last 2 sts K2tog
Knit around
Repeat last 2 rows until there are 8 sts on needle. Continue working in garter stitch until the handle is half the required length. (I did 15 rows) Cut yarn and slip these 8 sts on holder.

Slip the 15 sts on holder back onto needle. Rejoin yarn. K2 tog. K to end
Knit around.

K2 tog K to last 2 sts K2tog
Knit around
Repeat last 2 rows until there are 8 sts on needle. Continue working in garter stitch until the handle matches the first half. Graft or kitchiner stitch the two sides of the handle together.

Sew the gap in the base where from the initial increases and weave in ends.

Embroider eyes onto the cabled owls, or sew on buttons / beads


Fill a cup with coffee or buy a starbucks!

Grab and Go Diary Cover


This is a design for an A5 diary cover. There is a pocket for a mobile phone, a slot for a pen, and all those essential bits of paper can be tucked behind it on the inside cover.

I used size 4mm straight needles and DK weight acrylic yarn. You will also need a stitch holder and a cable needle. Tension is not vital.

Abbreviations:
  • Kfbk = Knit front and back of the same stitch
  • C4B = slip next 2 sts onto cable needle and hold at the back of the work. K the next 2 sts from needle, then K the 2 sts from cable needle
  • C2B = slip next st onto cable needle and hold at back of the work. K the next st from needle, then K the st from cable needle
  • C4F = slip next 2 sts onto cable needle and hold at the front of the work. K the next 2 sts from needle, then K the 2 sts from cable needle
  • C2F = slip next st onto cable needle and hold at the front of the work. K the next st from needle, then K the st from cable needle

First make your pocket:
  • Cast on 12 stitches.
  • Work 22 rows in stocking stitch (1 row K, 1 row P)
  • Cut yarn and put these 12 sts on a stitch holder.

For the main cover:
  • Cast on 24 stitches
  • Work 66 rows in garter stitch (every row knit)
Start Front:
  • Row 1 - K4 P16 K4
  • Row 2 - K across
repeat the last 2 rows 5 more times (12 rows)
  • Row 13 K4 P4 K8 P4 K4
  • Row 14 K8 P8 K8
  • Row 15 K4 P4 C4b C4f P4 K4
  • Row 16 K8 P8 K8
  • Rows 17 to 20 rep rows 13 and 14 twice
  • Row 21 K4 P4 C4b C4f P4 K4
  • Row 22K8 P8 K8
  • Rows 23 to 24 rep rows 13 and 14 once
  • Row 25 K4 P4 C4b C4f P4 K4
  • Row 26 K8 P8 K8
  • Row 27 K4 P4 C2b K4 C2f P4 K4
  • Row 28 K across
  • Row 29 - K4 P16 K4
  • Row 30 - K across


Make pocket
  • Row 31 K4 P2 slip next 12 sts onto stitch holder. Slip 12 sts for pocket onto left needle. P across these 12 sts. P2 K4
  • Row 32 K across
  • Row 33 K4 P16 K4
  • Row 34 K across
  • Repeat last 2 rows 3 more times

Make pen holder
  • Row 41 K8 YO K6 YO K to end
Work 7 rows Garter stitch
Cast off

Slip 12 sts from stitch holder onto needle
Work 4 rows garter stitch
Cast off

Stitch the pocket to the main body from the inside (sides and bottom)
Stitch the garter stitch pocket top to the main body on the outside (edges only)


Oversew cast on and cast off edges of the body together inside out
Sew on beads or buttons or embroider eyes.

Slip onto A5 diary and off you go!


Friday 30 November 2012

Yummy Plummy rum

Time to decant and strain the plum rum. Tastes sooo good!


I have cooked the plums, so no waste - and i will make some sort of cake / pudding with them tomorrow.


I LOVE this time of year!

Sunday 25 November 2012

White Rabbit syndrome

I am sooo late with this! Crimbo cake usually having it's third tot of rum by this time of year.

Plenty of rum soaked fruit in the cake though, so it should make up for it flavour wise.


All mixed and in oven now - kitchen smelling all rummy and spicey again!


Tah dah!


Friday 23 November 2012

Really easy straightforward Beanie


I used approx 100g aran weight yarn for this project

On 5mm circular needle, CO 96
K2 P2 rib for 30 rounds

Decrease (changing to magic loop or DPNs as preferred when needed):
Round 1:  (Rib 6 P2tog). rep to end of round. 84sts on needle
work 3 rounds as stitches present

Round 5: (K2 P2tog K2 P1) rep to end of round. 72sts on needle
work 3 rounds as stitches present

Round 9: (K2 P1 K2tog P1) rep to end of round. 60sts on needle
work 3 rounds as stitches present

Round 13: (K2tog P1 K1 P1) rep to end of round. 48sts on needle
work 1 round K1 P1 rib

Round 15 K2tog across round. 24sts on needle
Cut yarn. Thread yarn through remaining stitches and draw tight.

For the neckwarmer I cast on 96sts, K2 P2 rib for 40 rows then cast off.

Monday 19 November 2012

Mimi

To Mimi's family

"So sorry for your loss". How many times has that been said? Too many to sound sincere. But it is. I am very sorry for your loss. And mine.
 
Mimi - real name Irmgard, renamed by the children who mispronounced "Oma". From then on she was Mimi to all who loved her.

Mimi has to be the most incredible person I ever knew. She was courageous. She was strong. She survived so much, yet remained caring and compassionate. She had strong principles and stuck to them, even in the face of ridicule at times.

She overcame great personal and national tragedies, which I believe contributed to her strength. She was the most self aware person I met in my life, overcoming conditioning to become capable of great empathy. When she relaxed enough she had a sense of humour second to none.

While I knew her I admired her, respected her and grew to love her.

I truly am sorry for our loss.

1929 to 2012


Sunday 18 November 2012

My new carpet


Isn't autumn colourful? This was my garden yesterday. Didnt catch the sun out but still made me feel good about life!

Saturday 17 November 2012

38 days to go!

Kitchen is smelling sooooo good! The fruit for the Christmas puddings has been soaking in rum for the last month. I strained it last night, ready for the "mix n wish" this weekend. Can you believe it has soaked up almost half a bottle?

Will use any fruit left in the cake

Love the Christmas spicey smell. Thats probably why I do it each year. Also love the feeling of tradition and family closeness.


The fruit in the jar is soaking ready to make the cake next week - Mmmmmm

Please feel free to have a virtual stir and wish! Sniff a cinnamon stick for an authentic atmos!

Ready to gift:

Tuesday 13 November 2012

Rocking the Chair

So I have this very old, very tatty but incredibly comfy chair


And I want to make it a thing of beauty and a joy to behold - using a second hand pair of curtains:


Today i covered the cushion, made a simple envelope closure, like a pillow case:


As modelled by Arnie and Hollie!


Now I have to work  out the tricksy problem of the body of the chair. Watch this space!

Sunday 11 November 2012

Four legged jacket

I needed to knit a jacket for my King Charles Cavalier, Hollie. She needs clipping, but the weather has turned so cold. It needs to have 4 legs as she has alopecia on her back leg, so is almost bald. Here goes:

Cheap aran yarn. Knit flat on 5mm circular needle.

Cast on 80 stitches.
Work back and forth, K1 P1 rib 6 rows, making a button hole at the beginning of the 3rd row as follows: K1 P1 K1 yo K2tog P1

Row 7. Rib 6. K20. Rib 28.K20 Rib 6
work 7 more rows as stitches present, making a button hole at the beginning of row 13.

(14 rows in total to this point)

Divide for front legs: Work 26 sts as set and turn. Continue working on these 26 sts for 14 more rows, working a buttonhole at the beginning of the last row. Break yarn.

Rejoin yarn to the centre 28 sts and work in K1 P1 rib for 15 rows. Break yarn

Rejoin yarn to last 26 sts and work as stitches present for 15 rows.

Next row - work across all 80 sts as set, so joining all sections together again.

Work 20 rows as set, making a button hole on 13th row.

Next row: Work 26 sts. Cast off 28 sts (all the centre rib section). Work 26 sts.

continue on the last 26 sts for left back:

1) Rib 6 P12 P2tog rib 6
2) Rib 6 K2 tog K11 rib 6
3) rib 6 P10 P2tog rib 6
4) rib 6 K2 tog K9 rib 6
5) rib 6 P8 P2tog rib6
6) rib 6 K2tog K7 rib 6 = 20sts on needle

7) rib 6 P14
8) K14 rib 6
Rep last 2 rows 10 more times

Work 6 rows K1 P1 rib
Cast off.

Rejoin yarn to remaining sts for right back.
1) Rib 6 P2tog P12 rib 6
2) Rib 6 K11 K2 tog rib 6
3) rib 6 P2tog P10 rib 6
4) rib 6 K9 K2 tog rib 6
5) rib 6 P2tog P8 rib6
6) rib 6 K7 K2tog rib 6 = 20sts on needle

7) P14 rib 6
8) rib 6 K14
Rep last 2 rows 10 more times

Work 6 rows K1 P1 rib, working a button hole at the end of row 3
Cast off

 Work will now look like this:


Pick up and knit 10 sts for left back leg, along stocking stitch section of left back. Marked with pins in the next picture:


work 12 rows K1 P1 rib, increasing 1 stitch at each end of every odd numbered row. (20 sts)
13) cast on 5 sts. rib to end
14) cast on 5 sts. rib to end (30sts)
work 10 more rows in rib
Cast off

Repeat for right back leg.

Front legs: Pick up and knit 24sts around leg opening.
K1 P1 rib 8 rows.

Should be looking like this:


Cast off. Sew leg seams and weave in ends


Sew buttons to correspond with buttonholes.


Put on very shy dog. (wash floor before taking pics!)


This is my first ever written pattern (and blog!) so any feedback would be much appreciated. Also, I would love to see any mods made to this pattern!